Fusion 360 Draw Line Tangent to Two Circles
Transcript:
Past the end of this video, y'all'll have a solid understanding of all five circumvolve commands that are available in Fusion 360.
For this demo, I'll exist using some sketches that I've gone ahead and gear up to reinforce how the circles work. You can download the demo file in the video clarification.
The circle tool is another commonly used sketch tool in any CAD program. To make things even more efficient, Fusion 360 offers 5 unlike types of circles. Each one is created using dissimilar selections and each ane includes different types of constraints.
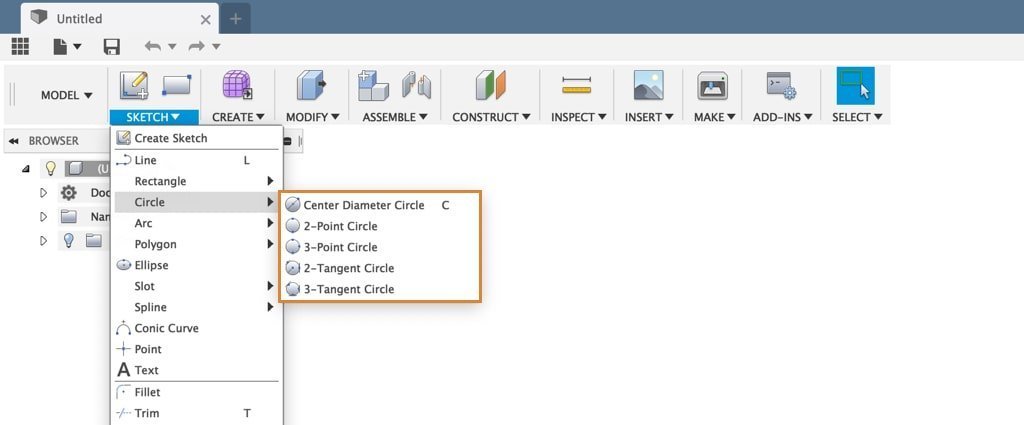
If you become to the circle flyout carte du jour located in the sketch dropdown listing, y'all'll notice all 5 circle tools are located in that folder. The start option, the " Center Diameter Circle (keyboard shortcut "C") Creates a circle using a center signal and diameter. Select to ascertain the center point then specify the bore. More than ," is one of the nearly normally used circle tools, which is why the Fusion engineers have given it the keyboard shortcut letter "C" as in Charlie.
The last thing I want to betoken Creates a sketch point. More out before I cover each circumvolve tool is that if you find yourself using other circle tools a lot, then you can assign your own custom keyboard shortcuts to them. I'll link to the custom keyboard shortcuts video down below in the video description.
At present, I'll go ahead double click on the sketch in the timeline The timeline lists operations performed on your design. Right-click operations in the timeline to make changes. Drag operations to change the order they are calculated. More to edit the sketch…and then I tin can depict the circles with the demo geometry. I'll select The selection manner controls how objects are select when you lot drag in the canvas. More than the Eye Diameter Circle in the mark card past correct-clicking, selecting sketch at the bottom and the center circle is in the upper lefthand corner.
The Eye Bore Circle requires two mouse clicks. The starting time mouse click sets the center betoken of the circle. I accept this rectangle here with 4 equal sides. I'll set the center by clicking on the middle point of the rectangle where these two construction lines cantankerous. Then, as I drag out with my mouse you'll discover that I can either type out a dimension, followed by the enter key, or I can click at the corner point if I desire the circle to line (keyboard shortcut "L") Creates lines and arcs. Select a start and endpoint to define a line segment. Click and elevate the endpoint of a segment to define an arc. More up with the exterior of the rectangle… or I can click at the midpoint of a line, where the circle volition snap tangent to the edge of the rectangle. Then I'll just go alee and click here to snap the circumvolve tangent to the border.
Similar whatsoever sketch tool, the circle tool volition remain active until you lot select another command or hit the escape key on your keyboard. You'll also find that you tin can switch between each type of circle by clicking on a different type in the sketch palette.
I'll switch to the offset one, the 2-betoken circle Creates a circle divers by two points. Specify two points on the diameter of the circle. More . The two-point circle also requires ii mouse clicks. I'll click on the top line to set the first point. And then, yous'll see as I move my mouse around, the circle is tied to that outset bore point, unlike the eye circle that is tied to the center point. This 2-point circle gives you a bit more flexibility to snap into other sketch geometry. For at present, I'll simply click the top left corner of the rectangle.
The next circle is the iii-point circumvolve Creates a circle defined by iii points. Specify three points on the circumference of the circle. The points define the size and the position of the circle. More , which I'll select in the sketch palette. The 3-point circle allows you to create a circumvolve by defining 3 points of the circumvolve's circumference, or the outer border.
The kickoff two points are the diameter or width of the circumvolve, and the third indicate is the height of the circle. For this circle, I'll click on this inner corner for the first point, and the opposite corner for the second point. Then, you'll see as I drag my mouse effectually the circle volition stay snapped into the first two points and information technology will resize according to the location of the third point. I desire this circle to exist independent inside this geometry then I'll click the midpoint of the bottom line… which you lot'll detect added a tangent constraint.
Yous can also admission all v circles from the right-click sketch menu, within the circumvolve flyout folder.
The next circle on the list is the two-tangent circle Creates a circle tangent to ii sketch lines. Select 2 lines then specify the radius of the circumvolve. More . This circumvolve requires three mouse clicks. The beginning two clicks will be points or lines that you want the circle to stay tangent two. Then, the tertiary bespeak volition be the size of the circle. I'll select these inner two lines… and you'll notice the circle stays tangent to these two lines…even if the circumvolve is larger than the lines. Later clicking to gear up the size or the 3rd point, you lot'll notice the tangent constraints were automatically created for the two tangent lines.
The terminal circle is the iii-tangent circle Creates a circle tangent to iii sketch lines. Select 3 lines that the circle will exist tangent to. More . Now, this circumvolve works just as the 2-tangent circle with the obvious exception that you lot will exist able to cull 3 tangent pieces of sketch geometry.
I'll click this top inner line… the bottom inner line… and I'll click this tiptop horizontal line… and notice that the circle is tangent to this bottom line here, even though it doesn't physically touch it… and it's gone ahead and added all three constraints for us.
In summary, even if y'all find yourself mainly using eye circles, yous'll notice that all the circle types offering a different amount of flexibility and control. Which circle yous use really comes down to your specific needs. The all-time circumvolve is always the circle that will relieve (keyboard shortcut CMD/CTRL+S) Saves the file that is currently open up. More than you time from having to manually add constraints.
Reader Interactions
Source: https://productdesignonline.com/tips-and-tricks/how-to-use-the-circle-command-in-fusion-360-all-5-explained/